|
|
|
|
|
|
|
|
|
Braze Technologies
|
|
|
|
|
|
|
|
Innovative solutions for the "classic" arcade collector
|
|
|
|
|
|
Donkey Kong / Donkey Kong II
Multigame Kit -- Installation Guide |
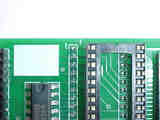
Step 0: Upgrading your kit from Donkey Kong to Donkey Kong IIIf you are
upgrading your original Donkey Kong High Score Kit to Donkey Kong/Donkey Kong II
Multigame Kit, then remove and install the two chips as shown in the diagram:
Note: Be sure the notch on the end of the chips are pointing the same
direction as the chips on the board!
* Chip Upgrade Only *
If you ordered a complete DK/DK II kit, skip this and go to Step #1.
Step 1: Turn off power to the gameIt is possible to install this kit
without removing your board from its cabinet, however, you may find it easier
to install the kit if you do remove the board. In that case, pay careful
attention (or label), any wire connections as you disconnect your board so that
you can correctly rehookup the game PCB afterwards. If your board uses the
large 44 pin edge connector, take note of which side of the connector if facing
the parts side of the board and which side faces the solder side, This
connector is typically not keyed and can be inadvertantly plugged in backwards
- ouch! It is recommended that you label the connector faces with something
like "parts side" or "solder side".
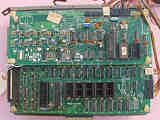
Step 2: Locate the CPU boardThere are 3 different types of boards this
kit can be installed into. Locate the CPU board for your type of Donkey Kong
Board. In
general, the installation is the same between board types, only the Z80 chip
location is different.
CPU Boards
Click images for a larger
view |

Donkey Kong |
Donkey Kong 4-Board |
|
Step 3: Remove the Z80 CPU chipLocate and remove the Z80 chip on the
CPU board. Use the above photos to assist in locating it. The Z80 chip is a 40
pin (large) chip, located at 7C (for the 2-boardset games or 5C for the DK
4-boardset game). Remove the chip gently by using a flat head screwdriver to
pry it out of its socket from each end. Becareful not to bend any of the pins.
If any pins do get inadvertantly bent, you will need to straighten them out
before the next step. Needle nose pliers work the best for this.
Step 4: Insert the Z80 into the daughter cardInsert the just removed
Z80 chip into the empty 40 pin socket on the High Score Save Kit. Make sure
pin-1 is correctly oriented. Pin-1 is marked on the Z80 chip usually by some
type of indentation or circle molded into the plastic. The end of the chip with
the marking, needs to match up with the socket on the daughter card that also
has a marking on the plastic. There should also may be a small sticker on the
daughter card marking pin-1.
Pin-1 Identification
Click images for a
larger view |
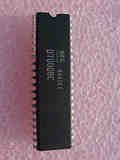
Z80 CPU Chip |
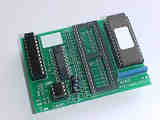
High Score Daughter Card |
Pin-1 Identification |
|
Step 5: Insert the daughter card into the CPU boardInsert the daughter
card back into the Z80 socket on the CPU board where the Z80 chip was
originally removed from. Again, make sure pin-1 of the Z80/daughter card is
oriented to correctly match pin-1 on the CPU board. Use the photos as a guide.
The header on the daughter board has pins that are more heavy duty than the
original Z80 pins, thus you will need to press very firmly to get the daughter
card to be fully inserted into the original Z80 socket.
Step 6: Double check your workReview the steps and double check that
Z80 is properly installed into the daughter card with no bent pins and that it
is correctly oriented for pin-1. And that the daughter card is also installed
snug into the z80 socket with pin-1 matched up.
Step 7: Powerup and game and enjoy!Reinstall your board into the
cabinet if necessary, and then powerup your game. You should immediately see
the bootup
screen. You will have 5 seconds to press P1 and enter setup
mode, or the game will timeout and automatically transition to gameplay
mode.
If the game does not come up, turn power off immediately, double check your
work.
< Prev Page
|
|


